Re-Stuffing Capacitors
4 minute read
October 2020
How to re-stuff the stud-mounted 100nF capacitors found in the R1155 and CR100.
Authenticity is something that is key when refurbishing vintage electronics. Take the Marconi R1155 as fitted in RAF bombers from 1940 until the early 1950s (and beyond in some cases!) as a case in point. The tall narrow chassis-mounted capacitors are iconic. Some are triple 100nF whilst a couple are single 0.5uF. Remove these, and the entire internal look of the receiver is changed. This is why when I refurbish an R1155, I re-stuff the existing aluminium cans with modern polypropelene capacitors ... thus retaining the visual appearance.
There are also six stud-mounted 100nF capacitors in the R1155 and a whopping twenty three of them in the Marconi CR100. In the R1155, these are tucked away, largely out of sight and you could get away with removing them altogether and simply fitting axial-lead modern ones but they are actually relatively easy to re-stuff. As far as the CR100 is concerned, the sheer number of them and where they are (physically) means that re-stuffing is probably your only option, unless you are not worried about aesthetics.
Having recently refurbished two CR100s, I have had the opportunity to develop a process for re-stuffing the single 100nF stud-mounting capacitors that is quick and beautifully elegant. I can re-stuff one of these in less than five minutes!
Here we go ...
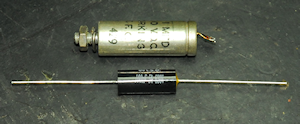
The object of the exercise is to get the the old paper, foil and wax innards out of the metal can and replace it with the modern capacitor without ruining the can.
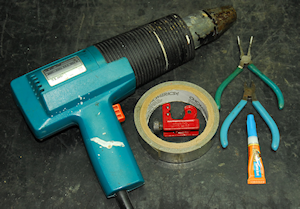
For this task, you will need the following:
Small-size pipe-cutter (type used for cutting 15mm pipe), heat-gun (I use a hot-air paint-stripper), side cutters, small-nose pliers, 1.5mm twist-drill, self-adhiesive metal tape and Super-Glue gel.
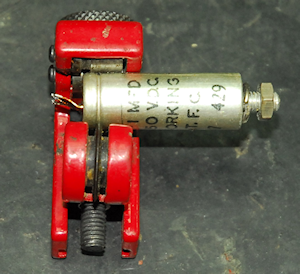
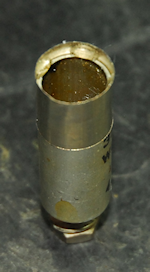
Place the original capacitor in the cutter such that the 'blade' runs in the groove and tighten it such that the 'blade' does not distort the can. Rotate the can once then re-tighten. You should only need to do this twice before the can is split.
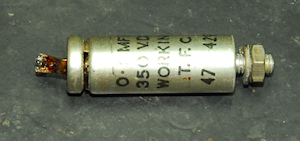

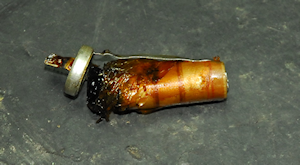
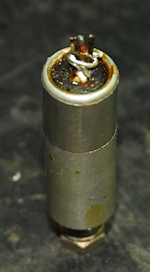
Grip the capacitor in a vice. I suggest not gripping the can itself, but instead grip the nut that screws onto the stud. This will prevent the vice from acting as a heat-sink. Using the heat-gun, warm up the can all round and using the small-nose pliers, gently pull on the top of the capacitor. Once you can see the innards emerging, grip the metal-foil strip as seen in the photograph on the left and continue to pull the innards out whilst continuing to warm the can. The innards should come out in one piece ... 90% of the time! Cut the old capacitor off the cut-off cap and clean off any bitumen filler.
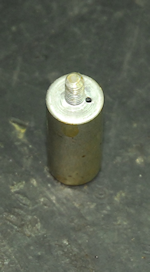
Allow the can to cool. There is no real necessity to clean the inside, but you can if you want. Now drill a 1.5mm hole close to the stud at the bottom of the can. It should be possible to feed one lead of the new capacitor through the centre of the tag in the top that you previously cut off. You may want to remove the small length of wire that connected the original capacitor to the tag first.

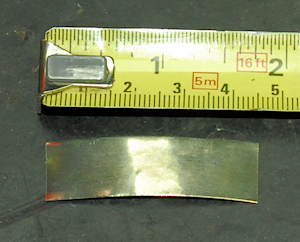
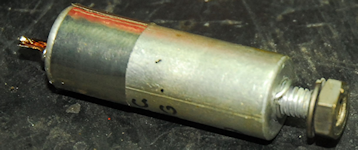
Cut a piece of self-adhiesive tape 4.5cm long, then cut it in half length-ways if necessary. Basically we want the strip to be no more than 10mm wide. Now clean the can and the 'cap' with alcohol to ensure that there is no dirt or grease present. The bitumen and wax in these old capacitors can get everywhere! Now wind the strip of tape on such that it protrudes above the exposed lip by no more than 2mm.
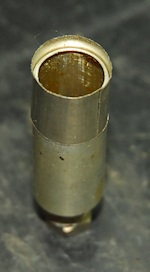
Now apply four small drops of super-glue gel to the inside of the exposed tape as in the photograph on the left. Next carefully insert the new capacitor into the can such that the lead goes through the 1.5mm hole that you drilled earlier ensuring that the cap of the can fits neatly inside the 'ring' of tape with the glue on it. It may be necessary to twist the cap stightly. Be careful not to distort the tape. Wrap the protruding lead around the stud only once, as below.
 Job done!
There are also six stud-mounted 100nF capacitors in the R1155 and a whopping twenty three of them in the Marconi CR100. In the R1155, these are tucked away, largely out of sight and you could get away with removing them altogether and simply fitting axial-lead modern ones but they are actually relatively easy to re-stuff. As far as the CR100 is concerned, the sheer number of them and where they are (physically) means that re-stuffing is probably your only option, unless you are not worried about aesthetics.
Having recently refurbished two CR100s, I have had the opportunity to develop a process for re-stuffing the single 100nF stud-mounting capacitors that is quick and beautifully elegant. I can re-stuff one of these in less than five minutes!
Here we go ...
The object of the exercise is to get the the old paper, foil and wax innards out of the metal can and replace it with the modern capacitor without ruining the can.
For this task, you will need the following:
Small-size pipe-cutter (type used for cutting 15mm pipe), heat-gun (I use a hot-air paint-stripper), side cutters, small-nose pliers, 1.5mm twist-drill, self-adhiesive metal tape and Super-Glue gel.
Place the original capacitor in the cutter such that the 'blade' runs in the groove and tighten it such that the 'blade' does not distort the can. Rotate the can once then re-tighten. You should only need to do this twice before the can is split.
Grip the capacitor in a vice. I suggest not gripping the can itself, but instead grip the nut that screws onto the stud. This will prevent the vice from acting as a heat-sink. Using the heat-gun, warm up the can all round and using the small-nose pliers, gently pull on the top of the capacitor. Once you can see the innards emerging, grip the metal-foil strip as seen in the photograph on the left and continue to pull the innards out whilst continuing to warm the can. The innards should come out in one piece ... 90% of the time! Cut the old capacitor off the cut-off cap and clean off any bitumen filler.
Allow the can to cool. There is no real necessity to clean the inside, but you can if you want. Now drill a 1.5mm hole close to the stud at the bottom of the can. It should be possible to feed one lead of the new capacitor through the centre of the tag in the top that you previously cut off. You may want to remove the small length of wire that connected the original capacitor to the tag first.
Cut a piece of self-adhiesive tape 4.5cm long, then cut it in half length-ways if necessary. Basically we want the strip to be no more than 10mm wide. Now clean the can and the 'cap' with alcohol to ensure that there is no dirt or grease present. The bitumen and wax in these old capacitors can get everywhere! Now wind the strip of tape on such that it protrudes above the exposed lip by no more than 2mm.
Now apply four small drops of super-glue gel to the inside of the exposed tape as in the photograph on the left. Next carefully insert the new capacitor into the can such that the lead goes through the 1.5mm hole that you drilled earlier ensuring that the cap of the can fits neatly inside the 'ring' of tape with the glue on it. It may be necessary to twist the cap stightly. Be careful not to distort the tape. Wrap the protruding lead around the stud only once, as below.
Job done!